NEAR + Rust, the friendly way
We couldn't find a good intro to both NEAR and Rust.
The Rust Book provides a wonderful intro to Rust, the most-loved programming language seven years running.
And some guides, cookbooks, and examples for NEAR with Rust are scattered here and there.
These are useful. These are fine. Especially the Rust Book. We recommend you read it later.
But none are what we wanted:
- A quick intro to Rust, providing just enough depth to get you started on your Smart Contract journey;
- Examples you can "touch and feel" in the RAEN Admin panel, so you get a quick feedback loop between modifying Rust code and actually using the resulting smart contract;
- Progressively more complex examples, so you can see the basics clearly and then build on those patterns.
That is, something like RAEN itself, built to help developers launch NEAR apps faster than they thought possible.
So this is less a "guide to RAEN" and more a "guide to NEAR + Rust, the RAEN way."
You'll be ready to get building faster than you think.
This guide assumes you have experience with the command line and at least one programming language. That's it.
About the name
"RAEN" is "NEAR" spelled backwards. It is pronounced the same as "rain".
Prefer video?
Let's get going!
Ok, if you're still here, you're ready to install some dependencies and look at some examples! Click to the next chapter.
Getting Set Up
-
Install or update Rust:
curl --proto '=https' --tlsv1.2 https://sh.rustup.rs -sSf | sh -
Add the WebAssembly (Wasm) toolchain:
rustup target add wasm32-unknown-unknownNEAR smart contracts need to be compiled to 32-bit Wasm with architecture and platform both "unknown".
-
Install RAEN:
cargo install raenThis will install
raenglobally, so it doesn't matter where you run it.cargowas installed with Rust. Cargo is the Rust package manager, like NPM for NodeJS. Rust packages are called crates.raenis a Rust crate. -
Install
near-cli:Prerequisite: install NodeJS.
npm install --global near-cliThere is a Rust version of near-cli in the works, but it's not ready yet. Someday
raenwill wrapnear(or work with the new Rust-based CLI as a plugin), allowing you to only install one package. But for now, you need both. -
Configure your editor:
In Visual Studio Code, install the rust-analyzer extension.
The tools recommended by the Rust Book will give you further superpowers, making you feel comfy and productive in no time.
-
Clone the Examples repository:
git clone --depth 1 --branch v0.0.4 https://github.com/raendev/examples.git --recursive raen-examplesThis will clone github.com/raendev/examples to a folder called
raen-examples. -
Build with RAEN:
Change into
raen-examples/contracts/counter, then build:raen build --releaseThis wraps
cargo build --release, adding some extra goodies.It may take a minute. Rust fetches dependencies and compiles your project in one step. Subsequent runs will go faster.
If you skip this, the editor setup from Step 5 won't work. The help docs shown by your editor are fetched along with the dependencies themselves.
Now you're ready to play with some Rust code. Let's go!
Basic Counter Example
At its core, the NEAR blockchain is a big database. A contract is a program with its own storage space, commonly called "contract storage" or "on-chain storage." You have access to read and write to this storage like you would any key/value data structure.
The simplest example of this is a counter. A contract that can read, increment, and decrement a value.
To follow along, use VS Code to open the contracts/counter folder inside the raen-examples project that you cloned in Getting Set Up. Then open src/lib.rs. We'll walk through this code in order.
Docs & Imports
The \\! lines at the top are container documentation comments you can use to document a whole contract/module/crate.
The use lines import dependencies, like import or require in JavaScript. Look in Cargo.toml to see that kebab-case crate names like near-sdk are turned into snake-case names like near_sdk in the code. Let's learn more about these specific imports by seeing how they're used.
State Shape
Rust's type system gives us a way to tell NEAR's Runtime how our contract's state is shaped. If you're following along, look for the struct definition on line 10:
pub struct Counter {
    val: i8,
}
About this:
| Thing | Explanation |
|---|---|
struct | A data structure with fields, similar to a class, object, Hash, or Dictionary in other languages. This struct is named Counter; you could name it whatever you want. |
val | This is a variable name; you could change it (using the F2 key in VS Code) to anything else you want, such as counter or number or num. |
i8 | val is of type i8, a signed 8-bit integer. This means it can be between -128 and 127. For more on Rust's number types, check out The Rust Book's description. For more on why i8 goes from negative 128 but only to positive 127, search for primers about how numbers get stored as binary. |
pub | Short for public, meaning that the item is visible outside of the file. You need this on the struct you intend to store in contract storage. Technically pub is a namespace, but that's not important right now. |
Ok, straightforward enough.
But if you're actually looking at the code in your own editor, you're probably wondering about the stuff right above pub struct Counter:
#[near_bindgen]
#[derive(Default, BorshDeserialize, BorshSerialize)]
pub struct Counter {
    val: i8,
}
These are called macros. Macros are Rust's way of generating extra code. This kind of "hash bracket" macro (#[...]) will expand the definition of the thing that follows, adding extra logic to save you from needing to copy-paste boilerplate.
(The other kind of Rust macro looks like a function, but has an exclamation mark, like log!(...). You'll see this soon.)
Here's what these macros are doing:
| Thing | Explanation |
|---|---|
near_bindgen | Generates bindings for NEAR. This is how you tell the NEAR Runtime that this is the struct you want to put in contract storage. |
derive(...) | The derive attribute. Takes a list of derive macros, and generates extra code for each one. |
Default | Generates a default value for the struct. If you check the rest of the file, you'll see that we never initialize Counter or val. But when you deploy the contract, you'll see that val defaults to 0. |
BorshSerialize | Generates boilerplate for taking your in-memory contract data and turning it into borsh-serialized bytes to store on-disk. |
BorshDeserialize | Generates boilerplate for reading borsh-serialized, on-disk bytes and turning them into in-memory data structures. |
Expand this section to see the code the above derive macro will generate.
impl ::core::default::Default for Counter {
    #[inline]
    fn default() -> Counter {
        Counter {
            val: ::core::default::Default::default(),
        }
    }
}
impl borsh::de::BorshDeserialize for Counter
where
    i8: borsh::BorshDeserialize,
{
    fn deserialize(buf: &mut &[u8]) -> ::core::result::Result<Self, borsh::maybestd::io::Error> {
        Ok(Self {
            val: borsh::BorshDeserialize::deserialize(buf)?,
        })
    }
}
impl borsh::ser::BorshSerialize for Counter
where
    i8: borsh::ser::BorshSerialize,
{
    fn serialize<W: borsh::maybestd::io::Write>(
        &self,
        writer: &mut W,
    ) -> ::core::result::Result<(), borsh::maybestd::io::Error> {
        borsh::BorshSerialize::serialize(&self.val, writer)?;
        Ok(())
    }
}
Borsh?
The data in your contract and, indeed, your contract itself, need to be stored on-disk in between calls to your contract.
Then when a NEAR user makes a call to your contract, validators' computers need to fetch your contract from storage, load it into memory, check how your contract's storage is shaped, then finally deserialize your contract storage and execute the call.
Borsh is a serialization specification (a way of representing data as bytes) developed and maintained by the nearcore team, because nothing else was good enough when NEAR started. The biggest problem with other serialization standards was a lack of consistency—the same in-memory object could be represented in multiple valid ways as bytes.
You'll see Borsh used in a couple different ways in NEAR contracts. The most common is here—as the serialization format for your contract data.
Methods
To attach methods to a struct in Rust, use an impl.
A View Method
Let's start by looking at the view method starting on line 17:
impl Counter {
    /// Public method: Returns the counter value.
    pub fn get_num(&self) -> i8 {
        self.val
    }
    ...
}
| Thing | Explanation |
|---|---|
/// | In Rust, you can use // for regular comments and /// for documentation comments, which will automatically be turned into documentation by various tooling, including RAEN. |
fn | The keyword for function |
&self | A reference to the Counter struct. This lets you access the fields on the struct, however, it is immutable meaning that you cannot change or "mutate" the field.The ampersand ( &) means that the get_num function borrows self, rather than taking ownership of self. To feel confident with Rust, you will need to understand borrowing and ownership. For now, pay attention to when this guide uses or omits the ampersand on variable names, and rely on Rust's industry-leading error messages to help you figure out if and when you need an ampersand in your own code. |
-> i8 | The return type of the method. A signed 8-bit integer, matching val. |
self.val | This accesses the field val. You will also notice that there is no return statement. This is because in Rust everything is an expression, and a function returns the value of the last expression, as long as there is no semicolon after it. |
Go ahead and play with this a bit. Do things that don't make sense, and your well-configured editor will yell at you. Looking at the errors will teach you about how Rust works. You can try each of these things, changing it back to how it was after each:
- Change
-> i8to-> i16 - Change
-> i8to-> (), an empty tuple - Remove
-> i18– note that you get the same error message as when you changed it to an empty tuple! Empty tuple is one of the closest things Rust has to avoidtype. - Change
self.valtoself.val; - Change
self.valtoreturn self.val;and it will behave the same way asself.valwith no semicolon. Note that this is super non-idiomatic! No one writes Rust this way. Get used to paying attention to the presence & lack of semicolons.
A Change Method
Next let's see how to mutate or change val. Look at the increment method starting on line 22:
impl Counter {
    ...

    /// Public method: Increment the counter.
    pub fn increment(&mut self) -> i8 {
        self.val += 1;
        log!("Increased number to {}", self.val);
        self.val
    }

    ...
}
| Thing | Explanation |
|---|---|
; | Rust uses semicolons to separate expressions. See that the last line here is the same as the only line in get_num, with no semicolon. You may have already guessed that this means set_num also returns the value of num. This also matches the return type, -> i8. |
&mut self | Here the reference to the struct is defined as mutable, allowing it to be changed. Mutable references are covered in that same chapter of the Rust Book on borrowing and ownership. |
self.val += 1; | The same as self.val = self.val + 1. This mutates the Counter struct. Note that the new value will not be saved to contract storage until the method call is over. If you have a bug in the log! line or before the return line, the new value will not actually be persisted. |
log! | This is a function-like macro, as mentioned above. log! generates code that formats a string and emits a log which you can see in NEAR Explorer or other block-explorer tools. |
Digging Deeper: Result Serialization
Look again at the view function get_num. It returns an i8. However, any call to a NEAR contract happens via Remote Procedure Calls, and this i8 needs to be serialized into something the consumer can read. By default, near_bindgen generates code to serialize it into a JSON number, since this is the most common case, e.g. a web app calling get_num. If you really need to, you can override this setting. For example, this would serialize it to Borsh instead:
#[result_serializer(borsh)]
pub fn get_num(&self) -> i8 {
    self.val
}
Serializing to Borsh can be useful in a couple cases:
- gas-intensive contract methods that need to optimize every detail
- methods only used in cross-contract call logic, where no external consumers are expected or allowed
However, most of the time you will probably want to stick with the default JSON result serialization, to make it easier for apps to interact with your contract.
Summary
In this unit we saw our first NEAR smart contract. We were introduced to some Rust basics, like its type system, numbers, struct, documentation comments, and (im)mutability. We saw how NEAR works with Rust to generate code for you using macros, leaving your code clean and focused on your own logic, rather than various boilerplate.
Next, we'll build the contract with raen and interact with it using RAEN Admin.
Using RAEN
Now let's use RAEN to build the contract.
From within the counter directory run the build command:
raen build --release
This does a few things:
-
Runs
cargo buildin a smart way:- Passes along relevant flags, such as
--release - Adds essential NEAR flags, such as
--target wasm32-unknown-unknown.
This creates a Wasm file at
./target/wasm32-unknown-unknown/target/counter.wasm - Passes along relevant flags, such as
-
Uses witme to inspect the contract's Rust code and generates Wit from it. Wit is a an emerging standard for describing the interfaces of Wasm binaries, on track to eventually merge with Wasm itself.
-
Creates a new Wasm file copied from the one generated in Step 1, injecting the Wit into a Custom Section.
-
Compresses this new Wasm file and saves it to
./target/res/counter.wasm. This compression makes the final result smaller than contracts built without RAEN, even with the Wit added. That's a good thing! Blockchains are space-constrained, and you'll need to pay for storage costs.
The TL;DR is that raen build is a fast, safe way to build your smart contracts, and it adds interface types to your contract which can then be used by other tooling, such as RAEN Admin.
Deploy
As mentioned in Getting Set Up, raen will eventually wrap near-cli. But for now, you need the near command to deploy:
near dev-deploy ./target/res/counter_contract.wasm
This will create a new throwaway NEAR account on testnet and deploy the contract to that address.
If you're using a bash-compatible shell such as zsh, you can use command substitution to build & dev-deploy in one step:
near dev-deploy $(raen build --release -q)
Note that this adds a -q flag to raen build, making it quiet. This means it only outputs the location of the built file.
Copy the contract address mentioned by the dev-deploy output; it will look something like dev-1234-1234 but longer. Now head over to raen.dev/admin and paste that address into the big box.
Like a good cooking show, a fully-cooked contract has already been deployed. If you're not following along with your own code, you can use RAEN Admin to investigate counter.raendev.testnet.
RAEN Admin
Now that your RAEN-built contract provides interface information, RAEN Admin can use it to generate a complete interactive form.
View Methods
First, notice on the top left that you have a login button and a list of view methods
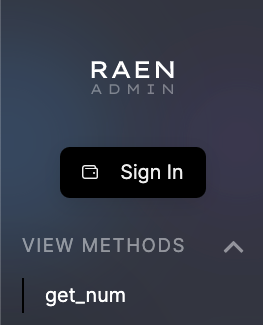
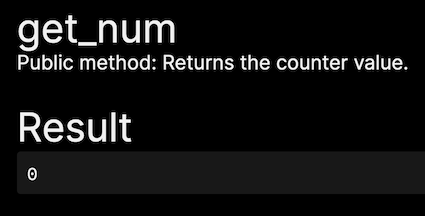
Clicking on get_num will immediately call the view method since it has no arguments.
You can also see that the comment from the code is displayed, helping to describe the method.
Change Methods
Below View Methods, you'll see Change Methods.
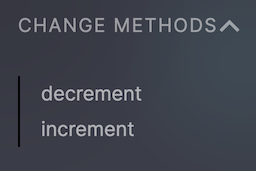
Let's pick increment.
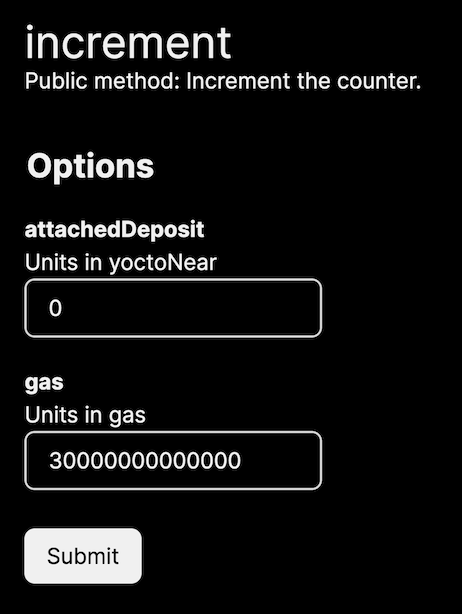
Again you can see the comments from the code. However, now there are two new fields in the form.
attachedDepositis how much near you want to attach to the transaction; it is in yoctoNear, which is the smallest unit of NEAR (1N = 1000000000000000000000000 yNor10^24).gasis how much gas to attach to cover the execution costs. It is in units of gas, here 30 TeraGas—more than enough for this transaction.
You will need to sign in to submit this form. If you don't have a NEAR testnet account, NEAR Wallet will guide you through creating one.
Once you sign in and submit the increment form, you can revisit get_num and see that it is now 1 (or probably something else, if you're using counter.raendev.testnet).
Digging deeper: look, no NEAR Wallet confirmation
If you're used to Ethereum apps, you may be surprised that submitting the increment form didn't require any confirmation to spend your testnet NEAR tokens on transaction fees.
NEAR prioritizes both developer and user experience. One way it accomplishes good user experience: negligible and predictable transaction fees, also called gas fees. And then, if gas fees are negligible for most transactions, why bother requiring user confirmation over and over and over?
Here is what actually happens when you sign in with NEAR:
-
NEAR Wallet adds a new FunctionCall Access Key to your account. You can see this listed in the "Recent activity" section on wallet.testnet.near.org. In a nutshell:
- This key can ONLY make calls to the
counter.raendev.testnetcontract (or your version of it) - This key has an allowance of 0.25 NEAR that it can spend on transaction fees on your behalf. If you use RAEN Admin for long enough to exhaust this allowance, every call to a Change Method will start redirecting to NEAR Wallet.
- If a transaction has an
attachedDeposit, no matter how small, it WILL require explicit user confirmation.
- This key can ONLY make calls to the
-
NEAR Wallet redirects to the previous URL at
raen.dev/admin, adding some extra URL parameters with information about this new Access Key. -
raen.dev/admin, using default behavior in near-api-js, adds this key to localStorage in your browser. If you know your way around your browser's Web Inspector, you can use it to see your key (be careful! this is a private key! but also it can only callcounter.raendev.testnetand can only spend 0.25 NEAR, so maybe you don't need to be too careful).
Summary
Congratulations! You deployed your first NEAR smart contract. And since you built it with raen, you were able to interact with your contract using RAEN Admin. This required creating your first NEAR testnet account, which taught you a little bit about NEAR's account system. Named accounts! Multiple access keys for each account! Great UX that doesn't require confirming every negligible transaction.
Now let's investigate a bug in this contract, and learn how to fix it and deploy an updated version of the contract.
Updating the contract
Without overflow checks enabled, if val is currently 127, the next time it is incremented it will overflow, wrapping around to be -128. Likewise, it can underflow if currently -128 and you decrement.
This would obviously be very bad news if you were building your own smart-contract-based currency!
Let's see if we can make val overflow. And then let's see how to prevent this.
Method 1: mash increment 128 times
With the existing contract, you could use the RAEN Admin panel and mash the Submit button on the increment form 128 times.
This could take a while, though! Let's see if we can improve the code to make it easier.
Method 2: new default
If you're following along with your own contract, you can change the default value of val to start at 127 rather than 0. This is a good way to learn about where the default of 0 currently comes from.
If you get stuck while following along, you can see this method and the following all implemented on this branch.
Above pub struct Counter, change the derive macro by removing the Default trait:
-#[derive(Default, BorshDeserialize, BorshSerialize)]
+#[derive(BorshDeserialize, BorshSerialize)]
Now, below the closing bracket of pub struct Counter, you can implement default manually:
#![allow(unused)]
fn main() {
pub struct Counter {
    val: i8,
}

impl Default for Counter {
    fn default() -> Self {
        Self { val: 127 }
    }
}
}
If you're following along
Build and re-deploy to see the new default:
near dev-deploy $(raen build --release -q)
Refresh your browser page to load in the updated contract. Check get_num.
But oh no, if you've already incremented or decremented the number, you'll see that this made no change. Which is what you'd expect! It only changes the default. That is, the value that is shown if you didn't actually change it and store the new value.
To see this default in action, you can delete the neardev folder and run the dev-deploy command again. This will create a brand new NEAR testnet account before deploying your contract. You'll need to copy the new dev-1234-1234 address it gives you and paste it into RAEN Admin.
Now when you check get_num, you'll see the number you set as a default! Call increment (you'll need to sign in again, since this is a new contract) and watch it overflow.
If you're not
The contract deployed at counter.raendev.testnet already has a value for val saved to contract storage. It will not make use of a new default.
Let's try a different way.
Method 3: new set_num
See if you can write your own set_num method based on the code for increment and decrement in the contract. If you need a hint, here's what it looks like.
If you're following along
Save your file with new set_num, then build and re-deploy:
near dev-deploy $(raen build --release -q)
Unlike Method 2, you don't need to create a new testnet account. Just refresh the RAEN Admin panel and see the set_num method appear under Change Methods. Go ahead and try it out!
If you're not
The reference code has been deployed to v2.counter.raendev.testnet for you to play with.
Note that this code already fixed the overflow issue. If you want to see the overflow in action, you'll have to follow along with your own code.
Fixing that overflow
Now you can call increment and see that the number goes from 127 to -128. Oops! How do we fix it?
Open up the Cargo.toml file. Cargo.toml is to Rust what package.json is to NodeJS. You'll see sections for dependencies and dev-dependencies and more generic information about this package/contract/crate.
See those lines with overflow-checks = false? Change them to overflow-checks = true. Now rebuild and redeploy:
near dev-deploy $(raen build --release -q)
You'll see that this takes longer to build than when you make changes to your contract itself. Rust needs to recompile all of your dependencies using the new setting.
Refresh your admin panel, set the number back to 127, and call increment. You'll see an error message. This means the contract panicked rather than allowing the integer overflow. It worked!
Digging Deeper: wait, aren't blockchains immutable?
You may have heard that blockchains are immutable, that they provide permanent ledgers of all on-chain activity.
How does this fit with the fact that you just upgraded a smart contract, and it was actually super easy? It's even called a contract—doesn't that imply that it should be hard to change? If it's so easy for a contract owner to alter the contract, how can anyone using it trust they won't be scammed?
Great questions!
On other blockchains, it is in fact very difficult to upgrade a contract. They work around this with proxy contracts and other patterns.
But NEAR has that handy account system, where each account can have multiple keys. We already learned about Function Call Access Keys last unit; that's what makes it safe to have a web-based wallet, with web apps that store a restricted private key in a browser's local storage.
The other kind of key is a Full Access key. When you run dev-deploy, you get a Full Access key to a brand new testnet account. If you have a Full Access key, you can do anything with that account. Deploy or remove a contract, call other contracts, send tokens, create sub-accounts, even delete the account.
(Note that even all of these actions are stored on the permanent blockchain ledger! If you're running or know the address of an archival node, you can query the state of a given account at a given block/second in time, even if the contract on that account has changed or the account has been completely deleted. If you're querying a regular non-archival node, it will probably only keep about two days of history.)
In the early days of launching and testing a smart contract, it's nice to be able to leave the contract in "trusted mode," keeping Full Access keys around so you can iterate quickly. But if you want people to trust your contract with large investments, you'll want to get a security review from a reputable company, and those companies will want to make sure you don't have any Full Access keys still on the contract (you can get a list of all keys on any NEAR account with near keys in your command line), and that you didn't build in any sneaky ways to add new Full Access keys given only a Function Call key.
(Note that there still patterns that allow you to upgrade such a contract, such as requiring a review board to vote on proposed upgrades.)
If you're using a smart contract, especially if you're considering trusting it with significant assets, you should check that it had a security review first!
Summary
In this unit we learned about integer overflows, and played with them by updating our code to change the default value and add a new change method. We saw that we only need to refresh the RAEN Admin page to see the latest changes. We fixed the integer overflow bug by changing Cargo.toml settings. And we also learned about blockchain immutability and Full Access keys.
Next, let's learn how to deploy to a nicely-named account like counter.raendev.testnet.
Deploying to a subaccount
You might be wondering how to make a named contract, like counter.raendev.testnet instead of dev-1234-1234. Some news for you:
They're all named contracts!
If you're used to other blockchains, then you're familiar with the idea of a public key being synonymous with an account. Accounts and public/private keypairs are equivalent in blockchains like Ethereum and Bitcoin, but not NEAR!
NEAR accounts can copy this "public key as account name" setup. These are called implicit accounts. A neat thing about them is that you can create a unique, valid account address before making any on-chain transactions, entirely locally, using the magic of cryptography.
But most NEAR accounts you'll interact with are named. Like your account, or raendev.testnet. Furthermore:
- Any account can have subaccounts, like
counter.raendev.testnet - Any account can have a contract deployed to it
Your dev-1234-1234 contract isn't an implicit account. It's a named account, with a contract deployed to it. It just has a bad name! How can you give it a good name?
CLI Login
In your command line, run the command:
near login
This will open up testnet NEAR Wallet in your browser, and request a Full Access key for your account. Go ahead and say Yes.
Now verify that you have a file in ~/.near-credentials/testnet:
cat ~/.near-credentials/testnet/*.testnet.json
Great! Now you can use your named account from the command line.
Create a subaccount
You could deploy the counter contract right to the account you just used with near login, but you may want to leave it free for a different contract later. Or you might just want to leave it contract-free forever!
Let's create counter.YOUR-ACCOUNT.testnet, but with your actual account name instead of YOUR-ACCOUNT. To make the following commands copy-pastable, let's set up a bash variable. Note that this is using bash syntax, which only works with bash, zsh, and a couple other unix-type shells. If you're using Windows, you may just want to modify all the commands that follow.
Otherwise, this is the only command that you need to modify:
export ACCOUNT=your-account.testnet
Ok, now you can create a subaccount:
near create-account counter.$ACCOUNT --masterAccount $ACCOUNT --initialBalance 2
This makes a call to the blockchain as your-account.testnet (that's the masterAccount part), creating a subaccount, counter.your-account.testnet. It sends 2 NEAR tokens from your-account.testnet to the new account.
You can check that this was created correctly on NEAR Explorer. Paste your correct account name into this URL:
https://explorer.testnet.near.org/accounts/counter.your-account.testnet
You can also check the ~/.near-credentials/testnet folder again and see that a JSON file was added for this new one, too:
cat ~/.near-credentials/testnet/*.testnet.json
Subaccounts are a powerful and flexible feature of NEAR. You can create deeply nested subaccounts, such as v2.counter.your-name.testnet, and each one is a valid account with the same rights and permissions. An account can only create subaccounts of itself, not of its subaccounts (counter.your-name.testnet can create v2.counter.your-name.testnet, but your-name.testnet cannot).
In fact, testnet is an account, and all accounts that end in .testnet are subaccounts of it! It has a special contract deployed to it that makes it easy to create subaccounts. The same is true on NEAR's mainnet: near is an account, like any other. It's just a top level account, kind of like a top-level domain on the web (.com, .net, etc). Someday more top-level accounts will be made available and auctioned off.
Deploy to your subaccount
Right now, your subaccount has no contract deployed to it. If you run near state counter.your-name.testnet, you'll see that code_hash is all ones. This means it has no code—no contract—deployed to it:
near state counter.$ACCOUNT
Let's fix that:
near deploy counter.$ACCOUNT $(raen build --release -q)
That's it! Very similar to dev-deploy, but you need to tell it which account to deploy to. You'll also need to have credentials stored in ~/.near-credentials matching the account name.
You can verify that the code hash changed, if you want:
near state counter.$ACCOUNT
And you can go enter counter.your-account.testnet into RAEN Admin. It should look the same as the old dev-1234-1234 contract. But such a better name!
Summary
Over this whole Counter chapter, we saw our first Rust code: a simple NEAR smart contract that implements a counter. Anyone can call get_num to see the current value, and anyone can change the number, too! We learned about Cargo, Rust's package manager, in order to fix a bug. We saw that updating contracts is easy thanks to Full Access keys, and that we only need to refresh RAEN Admin to see the latest contract changes.
In this unit we experienced more of NEAR's account name system, adding a Full Access key to our local machines by using near login. This allowed us to create a subaccount, which also added a Full Access key for that new subaccount. And we deployed the Counter contract to that new account.
Overall, this Counter was a good way to learn some Rust and NEAR basics, but pretty silly as a real contract. Next, let's take a look at an example that does something more useful, storing different information for every user who calls the contract.
Basic Status Message Contract
Previously the contract had state that was shared by any account that can call the contract. Next we will show how each account can get its own state within the contract.
Signer Account
All change calls need to be signed by an account, this proves that no other account made the transaction. From the contract's perspective, when executing it has access to the current context which includes the signer account id.
Since this account id is unique to the signer it can be used as a key in storage. Let's take a look.
env, AccountId, and LookupMap
use near_sdk::{
    borsh::{self, BorshDeserialize, BorshSerialize},
    collections::LookupMap,
    env, near_bindgen, AccountId,
};
env provides functions for interacting with the NEAR blockchain. This includes env::signer_account_id(), which as you expect returns the account id of the signer.
AccountId is a wrapper type around String. Using it ensures that you won't use a malformed account id.
LookupMap is our first experience with a persistent data structure. You can think of them like corresponding data structures that have their data in storage. In this case LookupMap is like a HashMap, but the keys are contract storage keys and values are written to storage.
Contract State
Let's take a look at the struct that defines the contract:
#[near_bindgen]
#[derive(BorshDeserialize, BorshSerialize)]
pub struct StatusMessage {
    records: LookupMap<AccountId, String>,
}
This struct has one field records; a LookupMap that maps AccountIds to Strings.
You will also notice that this contract doesn't implement Default. This is because we are going to implement it ourselves!
impl Default for StatusMessage {
    fn default() -> Self {
        Self {
            records: LookupMap::new(b"r"),
        }
    }
}
This is how you create an implementation that fulfills a trait. In this case there is one function, default, which returns Self, which is a shorthand for the type implementing the trait, in this case StatusMessage.
When the contract executions it first loads the contract's state from storage. If no state exists it calls StatusMessage::default() to get the initial instance.
new
You might be familiar with constructors in other languages. Rust has no concept of a constructor, but it is common to have a function called new to create an instance of a type.
In this case, LookupMap::new(b"r") creates a new LookupMap. b"r" is byte representation of the string "r", which is used as a prefix before any keys. For example, eve.testnet --> reve.testnet. This creates a namespace for this data structure as long as this prefix is unique.
Contract Methods
In this case we will just have two methods, set_status and get_status.
set_status
    pub fn set_status(&mut self, message: String) {
        let account_id = env::signer_account_id();
        self.records.insert(&account_id, &message);
    }
Unlike the counter this method takes an argument, meassage which is a String. This message is then inserted into the map, which writes it to storage. You'll notice a &, which learned about in the previous chapter, this is how we pass a reference to insert, which will then be able to read the String to write it to storage.
get_status
    pub fn get_status(&self, account_id: String) -> Option<String> {
        self.records.get(&account_id.parse().unwrap())
    }
Here is our first example of an Option type. An Option is other some value or nothing, Option::Some(value), Option::None. This is the same as null in other languages. records.get will return None if the account was not in the map. This function will then return None.
We also need to convert the string account_id to an AccountId. There is a parse method, which returns will potentially fail if the account_id is invalid. In rust this is a Result, which either has a value or an error. unwrap let's us access the value and will panic and exit if there was an error.
Getting a blank status
Let's return to the admin panel this time for simple.statusmessage.raendev.testnet.
First, let's try getting the status message for an account that definitely won't have one. We should get back null, JavaScript's version of Option::None. This
Use the following link:
You'll notice that the link has some extra args at the end. This is the form data that will automatically fill in the form and since this is a view method it execute the call immediately.
Setting a status
raen.dev/admin/#/simple.statusmessage.raendev.testnet/SetStatus
Next, return to get_status, but this time with your own testnet account.
Adding a new Message struct
We just say how to make a message that was a String, but that is a little boring. Let's make a Message with a body and a title.
pub struct Message {
    title: String,
    body: String,
}
Next we need to update contract's state struct.
pub struct StatusMessage {
    records: LookupMap<AccountId, Message>,
}
Updating the Methods
Now we need to update our methods so that we can pass two Strings instead of just one.
set_status
    pub fn set_status(&mut self, title: String, body: String) {
        let account_id = env::signer_account_id();
        self.records.insert(&account_id, &Message { title, body });
    }
One thing to note is Message { title, body }, this is how you can directly create a message without using a new function like we saw earlier.
get_status
    pub fn get_status(&self, account_id: AccountId) -> Option<String> {
        self.records
            .get(&account_id)
            .map(|Message { body, title }| format!(r#"{{"body":"{body}", "title": "{title}"}}"#))
    }
Before account_id was a String, but now we can use AccountId directly which will panic the contract if the account id is not valid.
Next we have a new function map, which is a method Option. And a new syntax |Message { body, title}|.
map is a function takes a function as argument. Then if the Option is not None it will pass the inner value to the function. In Rust an anonymous rust has the following syntax, |x| x + 1, if you are familiar with JavaScript it is like an arrow function (x) => x + 1.
Rust let's you ~destructure~ the argument passed to the function.
#![allow(unused)]
fn main() {
|Message { body, title }| format!(r#"{{"body":"{body}", "title": "{title}"}}"#))

// Is the same as the function
|msg| {
  let body = msg.body;
  let title = msg.title;
  format!(r#"{{"body":"{body}", "title": "{title}"}}"#)
})
}
Lastly, we are creating a String that represents the JSON representation of Message, later we won't have to do this by hand.
format! is a macro for injecting strings into another in this case {body} and {title} are replaced by the corresponding variables.
r#".."# is called a raw string, which let's us use a " from within the string. And we need two {{ and }} so that format! understands that it's actually a { or } in the String.
Admin Round Two
Let's return to the admin panel this time for intermediate.statusmessage.raendev.testnet.
Setting a status
Now there will two input boxes in the form:
raen.dev/admin/#/intermediate.statusmessage.raendev.testnet/SetStatus
Get Status Message
Here is an example for eve.testnet:
Now the status should return a String of the JSON like
"{\"title\": \"hello\", \"body\": \"world\"}"
Next steps
Now let's take this a step further and use Message directly.
Advanced Message
Having to pass two arguments to create the Message is annoying, why not pass the Message directly!
First let's add some documentation to the struct:
/// A simple message with a title
#[derive(BorshDeserialize, BorshSerialize, Deserialize, Serialize)]
#[serde(crate = "near_sdk::serde")]
#[witgen]
pub struct Message {
    /// Title that describes the message
    title: String,
    /// body of the  message
    body: String,
}
Deserialize and Serialize are now needed to allow the Message to be parsed to and from JSON.
Update methods
#[near_bindgen]
impl StatusMessage {
    pub fn set_status(&mut self, message: Message) {
        let account_id = env::signer_account_id();
        self.records.insert(&account_id, &message);
    }

    pub fn get_status(&self, account_id: AccountId) -> Option<Message> {
        self.records.get(&account_id)
    }
}
Now we have Message as a argument to set_status and don't need to convert Message manually when returning it from get_status.
witgen
We just breezed by the following line:
#[witgen]
witgen is a special macro needed generate a type definition for user made types like Message.
We also skipped the line that imported the macro:
use witgen::witgen;
The witgen crate is
Admin Round Three
Let's return to setting a message and see what's different.
raen.dev/admin/#/advanced.statusmessage.raendev.testnet/SetStatus
Here is where raen really raen really shines.
The method's documentation and the types documentation are available. You can think of this as interactive documentation.
Getting Status
Next since we are using AccountId the type is available to the form. Meaning the the form can validate an account id before submitting it, preventing the call from failing on the NEAR node:
raen.dev/admin/#/advanced.statusmessage.raendev.testnet/SetStatus
You will also notice that now we don't get a string but a JSON object.